Wednesday, November 10, 2010

SEO Drupal 6 Google Friendly Page URLs

Posted by The Whizz | Wednesday, November 10, 2010 | 0 comments »

SEO Friendly Page URLs for Drupal 6 are a must if you want to get a decent amount of traffic to your website. Optimizing your site's page URLs will go a long way to improving SEO so that search engines like Google find your content and duplication of page URLs is minimized.

In this step by step Drupal tutorial I will show you how to tidy up your Drupal page URLs by optimizing the features on the core install of Drupal 6. In addition I will also guide you through the process of installing the Pathauto, Token and Global Redirect Modules for Drupal 6 to improve SEO.

I have written this tutorial with newbies and beginners of Drupal in mind. So in case you don't know what a page URL is let me explain briefly. Page URLs are the unique address given to a piece of content. By default Drupal 6 assigns nodes to and numbers to content that you create. Not very pretty. So to make Page URLs more search engine friendly we are going to install several modules that will replace the nodes and node numbers with logical page titles that reflect your content and pages. For example compare yoursite.com/node/1 with yoursite.com/seo/drupal-seo-friendly-page-urls

How to Create SEO Friendly URLS for Drupal 6

  1. Clean URL's

    1. Log in to your Drupal website

    2. Go to Administer > Site Configuration > Clean URLs

    3. Make sure this setting is enabled. If disabled enable it.

      Enable Clean URLs in Drupal
    4. Save changes


  2. Path Module
    Enabling the Path module in Drupal lets you change the name of URLs manually. By default Drupal URLs are not SEO friendly. With the Path module enabled we can manually type in a URL to improve its SEO friendliness. I'm sure you will agree that http://www.yoursite.com/content/page-title is preferable to http://www.yoursite.com/node/66

    1. Log in to your Drupal website

    2. Go to Administer > Site Building > Modules

    3. From the list of Core Optional modules check the Path module to enable it

      Enable Path Module in Drupal
    4. Click on the Save Configuration button


  3. Install the Pathauto Module

    1. Go to the Drupal website and download the latest stable version of the Pathauto module for Drupal 6. Make sure you select the version that will work with a Drupal 6 installation

    2. While at the Drupal website also download the Token module that Pathauto will need to run

    3. As both these modules have a tar.gz extension you may not be able to extract these files from your computer. If so head over to Wozip where you can quickly uncompress these files online. Download both of the uncompressed files to your computer as 2 separate zip files and then extract these zip files using Winzip or similar.

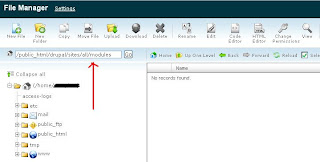
    4. Using your FTP program upload the Pathauto module to the sites/all/modules folder making sure you keep the same directory structure. If the modules directory does not exist you may need to create this first. If you are developing Drupal on your computer then you can just transfer the files via the copy and paste method

      Create Module Directory in sites/all in your Drupal installation using CPanel
    5. Next upload the Token module to sites/all/modules on your server

    6. Go to Administer > Site Building > Modules

    7. Check the box for both the Pathauto and Token modules that you will find in the list of Other Modules towards the end of the page to enable these modules

    8. Also check the Token Actions module to enable it


    9. Save configuration

    10. Go to Create Content > Page

    11. Select URL Path Settings from the lower part of the page


    12. Make sure that Automatic Aliases is checked

      When Automatic Aliases are enabled Drupal will automatically set all page URLs based on the configuration you set. For example you could set yoursite.com/pages/page-title as the default page URL for any pages you create. You can also override Pathauto's automatic creation of aliases to create your own page URLs by unchecking the Automatic Aliases box when you create a page and entering your own path. eg yoursite.com/page-title.

    13. Go to Administer > Site Building > URL Aliases (note this is a new menu item that appears as a result of installing these modules)

    14. Select the Automated Aliases tab from the menu at the top

    15. Click on Node Path Settings from the list

    16. Make any changes you wish to customize your page URLs as you prefer


    17. Check Bulk Generate Aliases for Nodes that are Not Aliased which will set an alias for any content you have already added

    18. Click on the Save Configuration button


  4. Install the Global Redirect Module
    The Drupal Global Redirect Module is a must for your website's SEO and will reduce risks of duplicate content. Installing the module will mean that all links to each piece of content on your site will direct to only one URL. The Global Redirect module also removes slashes from the end of URLs and makes your home page the standard home page and not an alias.

    1. Go to the Drupal website and download the most recent stable version of the Global Redirect Module

    2. Unzip the Global Redirect Module taking care to keep the same directory structure. Uncompress the tar file online at Wozip if you are unable to do it on your home computer

    3. Upload the Global Redirect Module to the sites/all/modules folder of your Drupal website on your server

    4. Once uploaded go to Administer > Site Building > Modules

    5. Enable Global Redirect Module from the Other Modules list

      Installing Global Redirect Module
    6. Click on the Save Configuration button

In this step by step Drupal tutorial I have shown you how to create a Google friendly Drupal website by optimizing page URLs. You have learned how to enable Clean URLs, install the Path, Pathauto, Token and Global Redirect modules for Drupal. I have also discussed how to configure the Pathauto module. I would appreciate your comments. Enjoy!

Bookmark and Share
0 comments »

Tuesday, November 9, 2010

In this beginner Drupal tutorial you will learn how to configure a new Drupal website following installation using Drupal 6.

This Drupal tutorial assumes three things:

  1. That you are a beginner at Drupal and have limited knowledge of how to configure your Drupal website

  2. You have just installed Drupal and are wondering what to do next to get your site up and running

  3. You are still using the Garland theme which is the default Drupal theme

Assuming you have used an auto installer to install your Drupal site on your website hosts server you will be ready to go ahead and make some configuration changes to personalize your new Drupal website. Here are some essential set up tasks to follow.

Essential Configuration Tasks to Set Up Drupal
    How to Configure Drupal Site Information
    The following step by step guide will show you how to configure the site information of your new Drupal website. You will learn how to add your own site title, slogan, email address, mission statement, copyright information in the footer to your new Drupal installation.

    1. Log in to your Drupal website

    2. Select Administer > Site Configuration > Site Information from the menu in the left sidebar

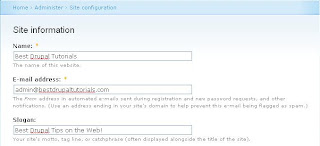
    3. Under Title enter the name of your Drupal website eg Best Drupal Tutorials

    4. Under Email Address enter an email address that corresponds to the website address you entered on installation. Typically this will be admin@yourdomain.com

    5. Under Slogan enter a tagline such as "Best Drupal Tips on the Web!". Note you can leave this blank if you don't want to use a slogan. For best effect it is probably better to enter your slogan in lower case.

      Setting Up Drupal Site Information - Title, Email Address and Slogan
    6. Under Mission enter a message for the front page or leave blank if you prefer. You can use this as a welcome message to your visitors instead of a mission statement

    7. Under Footer add your copyright information. For instance ©2010 Best Drupal Tutorials

      Setting Up Drupal Site Information - Footer
    8. Click on Save Configuration

    9. Navigate to Home via the breadcrumb at the top of the page. You are now in Home >> Administer >> Site Information and you want to be in Home

    10. Once in Home of your Drupal website notice that the site name is now visible at the top of the page. The mission statement if you added one will also be present. If you entered copyright information in the footer of the Drupal website you will see it has been added above the drupal logo in the footer.

      Please note that the slogan is not visible because it is disabled in Drupal by default. Refer to Configuring the Garland theme in Drupal for instructions on how to enable the slogan in Drupal

    How to Configure the Garland Theme in Drupal
    These step by step instructions will show you how to change the color scheme of your Garland theme, activate your slogan, delete the default Drupal logo and replace with your own custom logo, remove the Drupal shortcut icon and replace it with your own custom icon if desired, move the search box from the left sidebar to the right sidebar of your new Drupal website installation.

    1. Navigate to Administer > Site Building > Themes

    2. Under Configure at the top of the page select Global Settings

    3. Check Site Slogan

    4. Uncheck Search Box

      How to Configure Global Settings in Drupal
    5. Uncheck Use the Default Logo. It is OK to leave this field blank

    6. If you have a logo image already you can choose to upload it by clicking on the Choose File button under Upload Logo Image to upload it from your computer. Alternatively you can enter the Path or URL address of the image if it is stored on the net somewhere like Flickr or Photo Bucket

    7. Uncheck Use the Default Shortcut Icon. It is OK to leave this field blank

    8. If you already have a shortcut icon (the icon that appears in a visitor's browser) you can choose to upload it by clicking on the Choose File button under Upload Icon Image to upload it from your computer. Alternatively you can enter the Path or URL address of the icon if it is stored on the net somewhere like Flickr or Photo Bucket.

    9. Click on the Save Configuration button at the bottom of the page

    10. Click on the Garland theme at the top of the page which should be displayed next to Global Settings

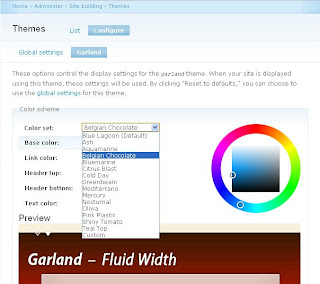
    11. From the dropdown menu under Color Set select a color scheme that reflects the image you wish your Drupal website to convey. If you are happy with the default color scheme Blue Lagoon leave this unchanged.

      Change the Garland Color Scheme via the Drop Down Menu
    12. Select the Site Slogan by checking it

    13. Deselect the Search Box by unchecking it

    14. Click on the Save Configuration button at the bottom of the page

    15. Navigate to Administer > Site Building > Blocks. You can get there directly by clicking on Blocks in the left sidebar menu

    16. Move the Search Form to the right sidebar by hovering over the cross and while holding down the left mouse button dragging the search form block to the right sidebar

    17. Navigate to Home to see the following changes:

      • Your slogan has been activated if you entered one under Site Information
      • The search box now appears in the righthand column of your Drupal website. By default the Garland theme in Drupal places it in the lefthand column above the menu.
      • The Drupal logo has disappeared and been replaced by your own custom logo if you uploaded one
      • The Drupal default shortcut icon is no longer present in your browser tab. It has been replaced either by nothing or your own custom shortcut icon

In this beginner Drupal tutorial you have learned how to configure your new Drupal 6 website. I have shown you how to add site information to Drupal so that it displays a custom title, slogan, mission statement, email address and copyright information. I have also shown you how to change the Garland theme to a new color scheme, move the search box to the right sidebar and remove the default Drupal logo and default shortcut icon.

I would love to hear any comments about the usefulness of this Drupal tutorial or any ssues you are having in setting up and configuring Drupal.

Bookmark and Share
0 comments »

Sunday, April 11, 2010

About Us

Posted by The Whizz | Sunday, April 11, 2010 | 0 comments »

Simply the best Drupal tutorials around. Tips, advice and help with Drupal. Learn about recommended modules and ways to customize your Drupal website. Find information on the latest Drupal themes. A number one Drupal resources blog

Bookmark and Share
0 comments »